
This is a recipe for how to make Paneer, a cottage cheese from the Indian subcontinent used in traditional dishes such as Palak Paneer (Spinach Curry). It’s far superior to store-bought with a much softer, creamier texture.
Super-easy to make, and so very satisfying!
Paneer – Fresh Indian cheese
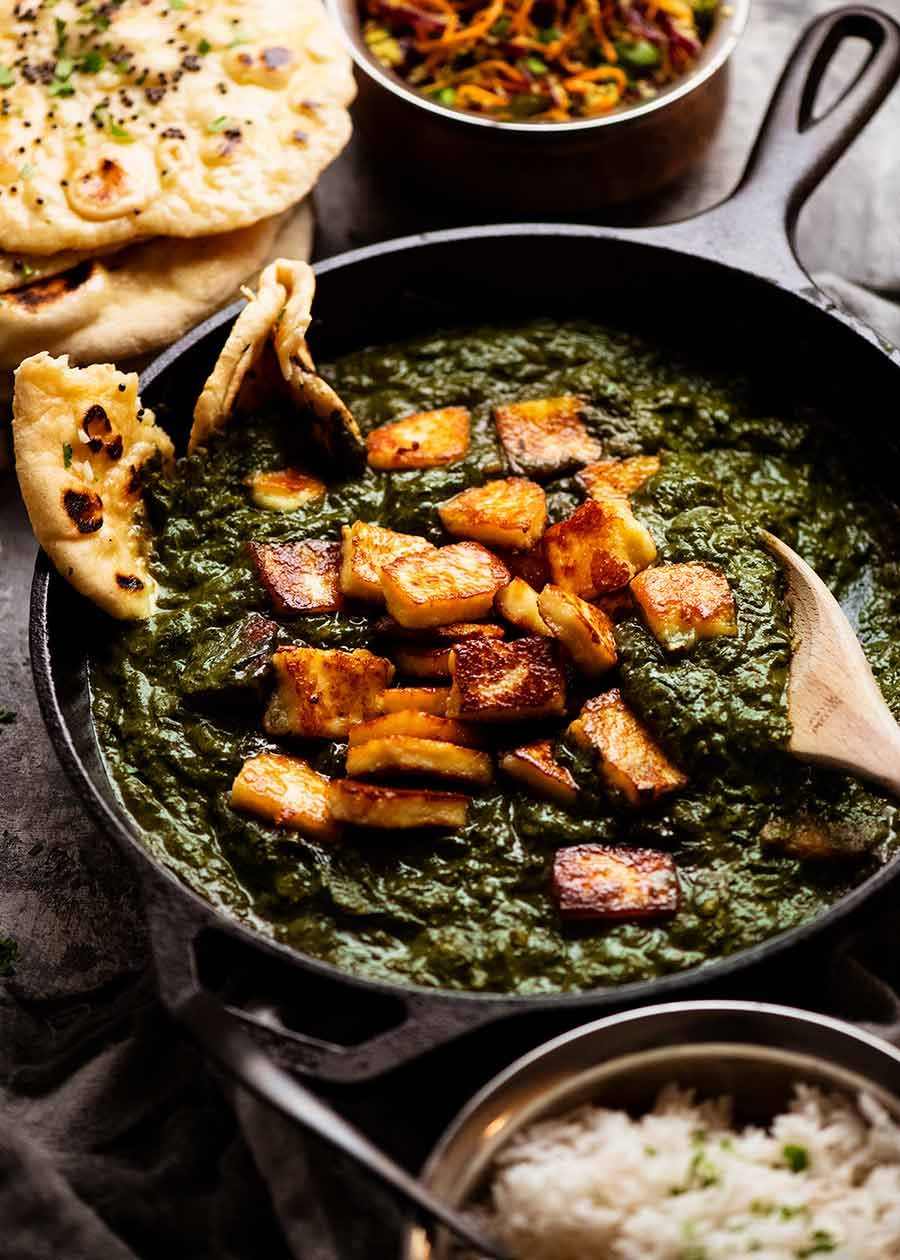
Paneer is a fresh cheese that is a common ingredient used in northern Indian (as well as other nearby countries’) cooking. Perhaps most well known is Palak Paneer, the iconic green spinach curry served with golden pan-fried paneer!
These days, you can buy paneer at large grocery stores in Australia such as Coles and Woolworths. But it’s much harder in texture and not a great product. Homemade is far superior – it’s softer and creamier.
Besides, it’s such a cinch to make and lasts for a couple of weeks in the fridge. So why wouldn’t you just make your own??

What paneer tastes like
Paneer is a fresh cheese so it’s somewhat similar to other fresh cheeses like ricotta, quark and cottage cheese. It’s got a milky flavour and a lovely texture a bit like firm ricotta. It’s not as creamy as say a brie, because it doesn’t have anywhere near the same amount of fat.
Paneer is unsalted so it’s quite bland if eaten plain. For Indian cooking, it’s intended to be eaten with flavourful sauces or spicing – like the Spinach Curry sauce pictured below for Palak Paneer!

What you need for homemade paneer
All you need is milk, and lemon juice or vinegar. Gee, I wish more recipes on my website called for just 2 ingredients! 😂
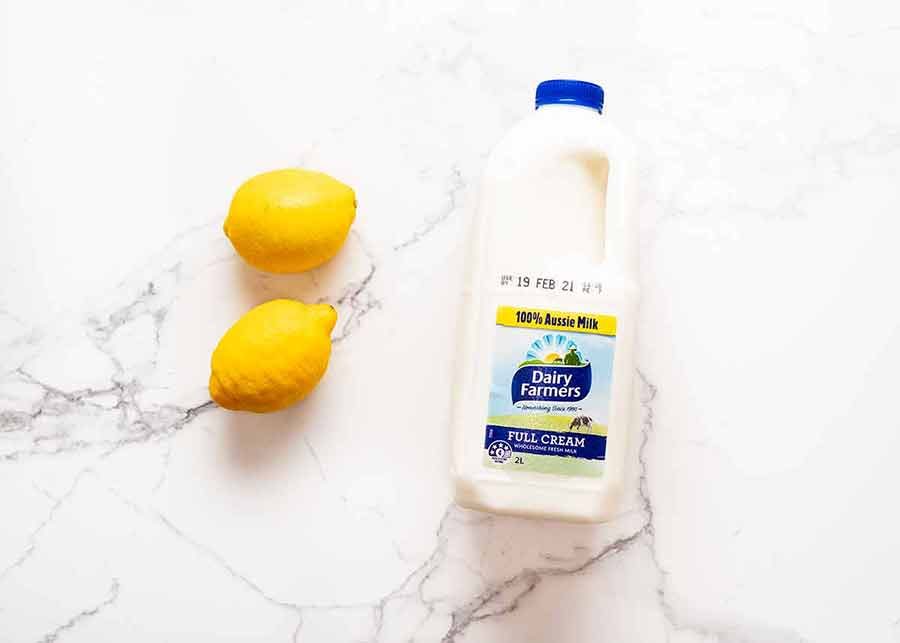
Milk – It has to be full-fat, otherwise it won’t set properly. I’ve only used cow’s milk, but I’ve read that buffalo milk works just as well; and
Lemon juice or vinegar – This along with heat is what causes the milk to curdle, the starting point of any cheese. Curdling is when the dairy separates from the liquid. I prefer lemon juice because it’s fresher and not as harsh in acidity flavour-wise, but standard white vinegar works too.
How to make paneer (fresh Indian cheese)

Heat milk, add lemon – Bring milk to just below boiling point. This is when the top is all foamy, and you can see it’s hot and steamy.
Once the milk is hot, turn the stove off. Add the lemon juice and stir for 1 minute;
Curdled milk – You’ll see the milk begin to curdle, with little white bits separating from the clear(-ish) liquid. This liquid is called the whey. The white bits are the good stuff, called curds – the foundations of cheese!
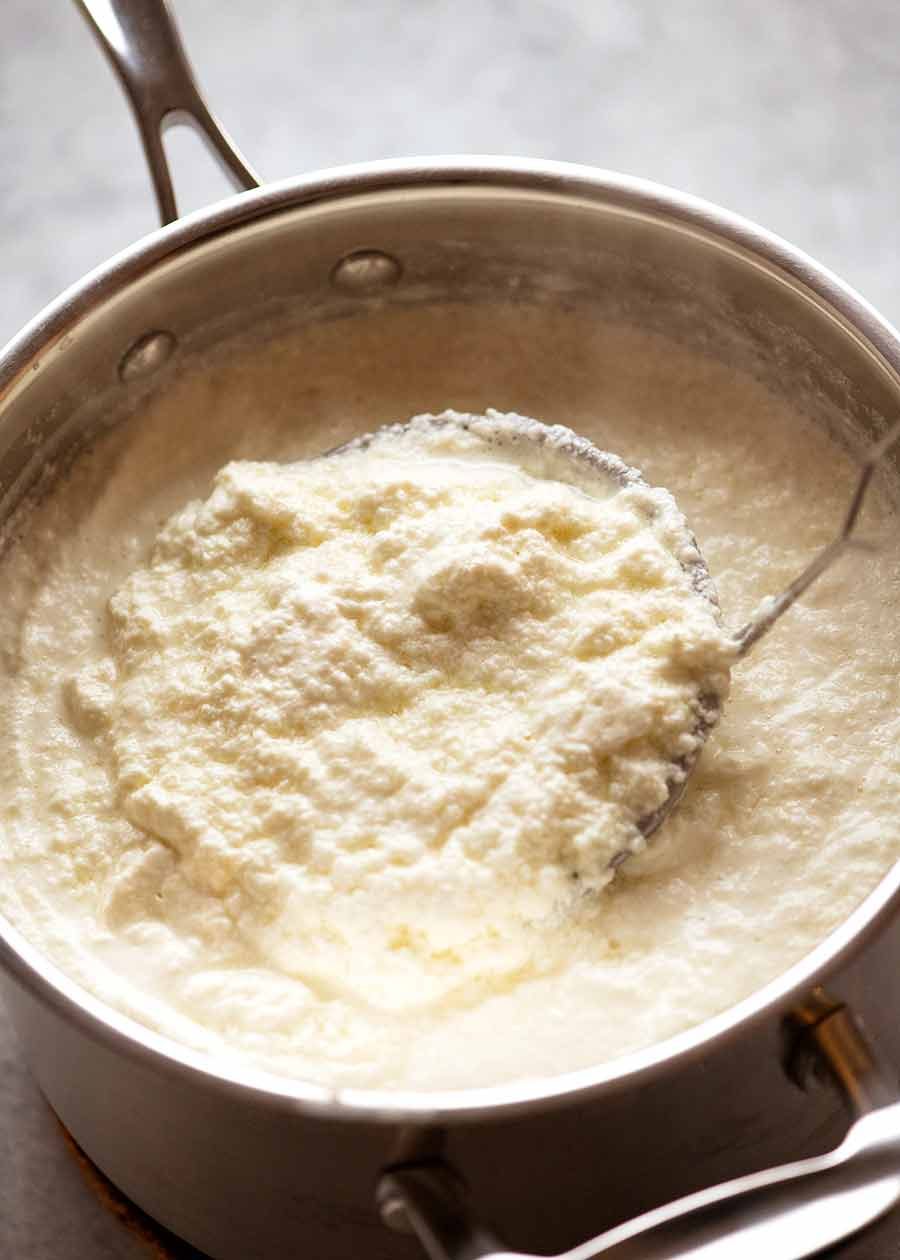
Milk not curdling? Turn the stove back on and bring the milk to a boil again, just until it starts separating. Then turn the stove off and keep stirring.

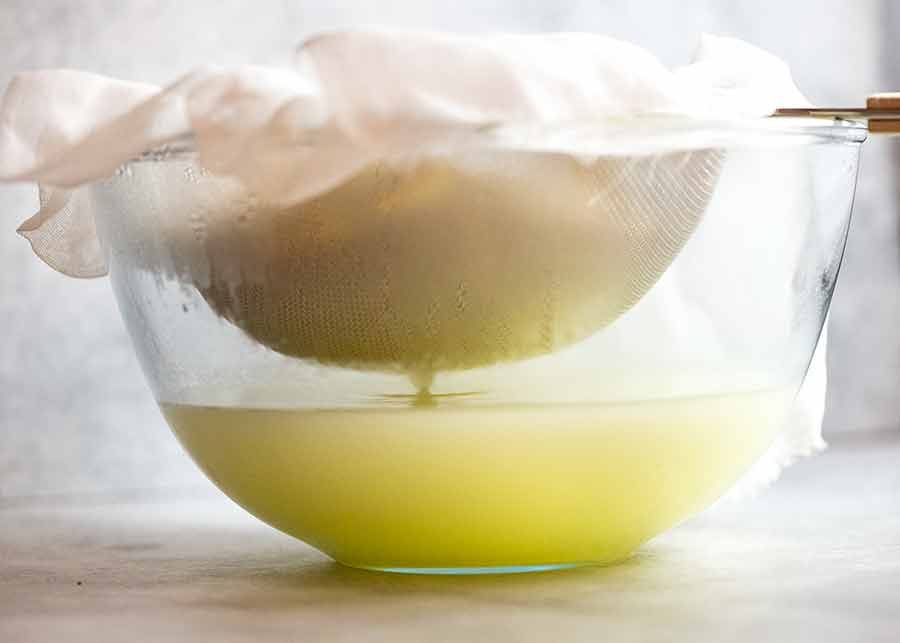
Line colander with cheesecloth – Set a sieve, strainer or colander over a large bowl, then line the strainer with 2 layers of cheesecloth (yes we’re actually using cheesecloth today for it’s original purpose!)
What’s cheesecloth? It’s a thin, loose-woven fabric used for cheese-making and other cooking purposes. It acts like a sieve, but the holes are much finer than standard utensils. Don’t try to drain paneer in a fine-mesh strainer or sieve –- you’ll lose the curds through the holes!
Where to find cheesecloth? At fabric stores and some kitchenware stores. You can get it for as little as $3 per metre.
Cheesecloth alternatives – Clean blue Chux wipes (yes, seriously!), a double layer of good-quality paper towels (don’t use cheap paper towels, they will disintegrate), or very thin handkerchiefs.
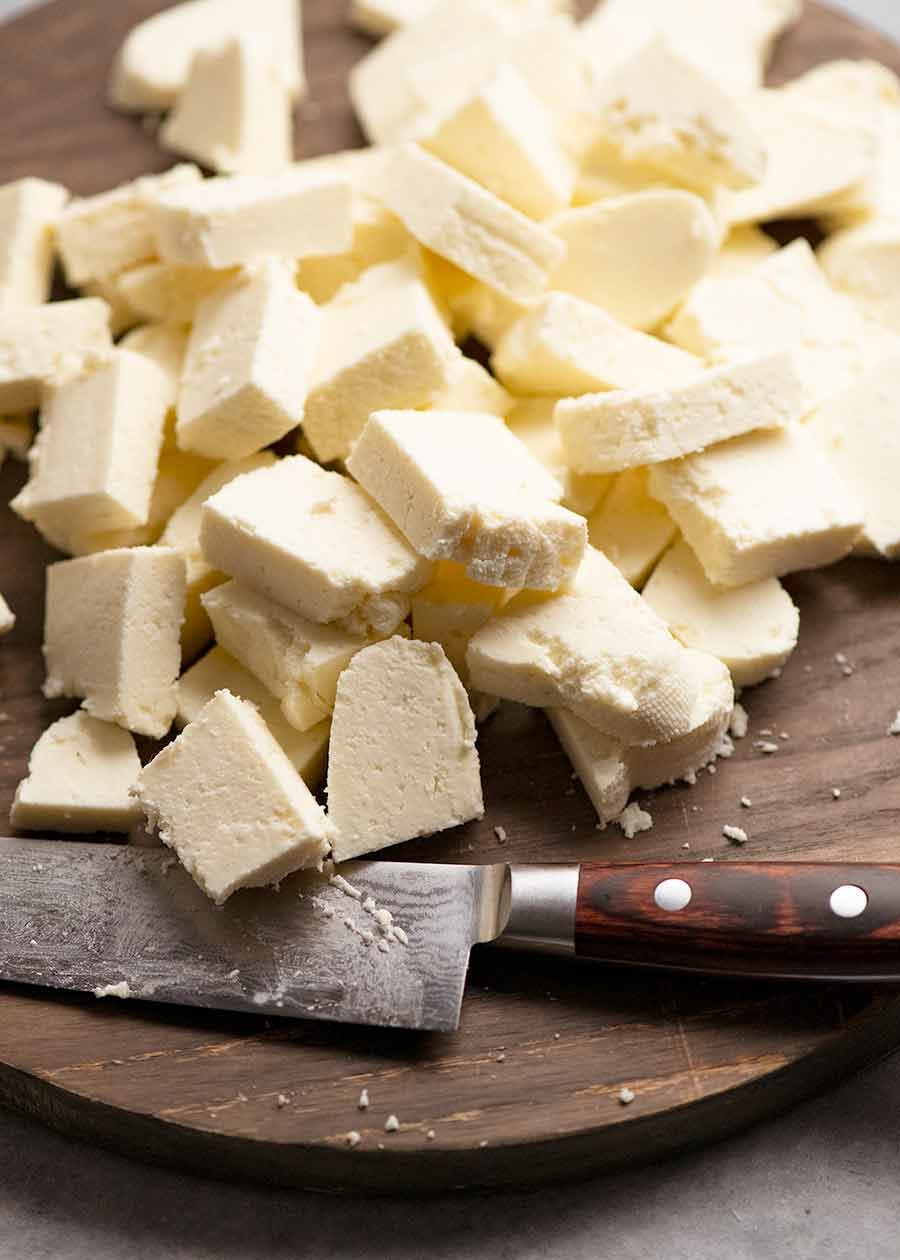
Drain paneer – Start by ladling the curdled milk into the lined strainer. When you have spooned in about half, you can pour the rest in. The whey can take 5 to 10 minutes to finish draining away, so if your strainer is small, you may need to strain the curdled milk in batches.
The paneer is drained once liquid stops dripping out. At this stage, the paneer will still be quite soft and watery.
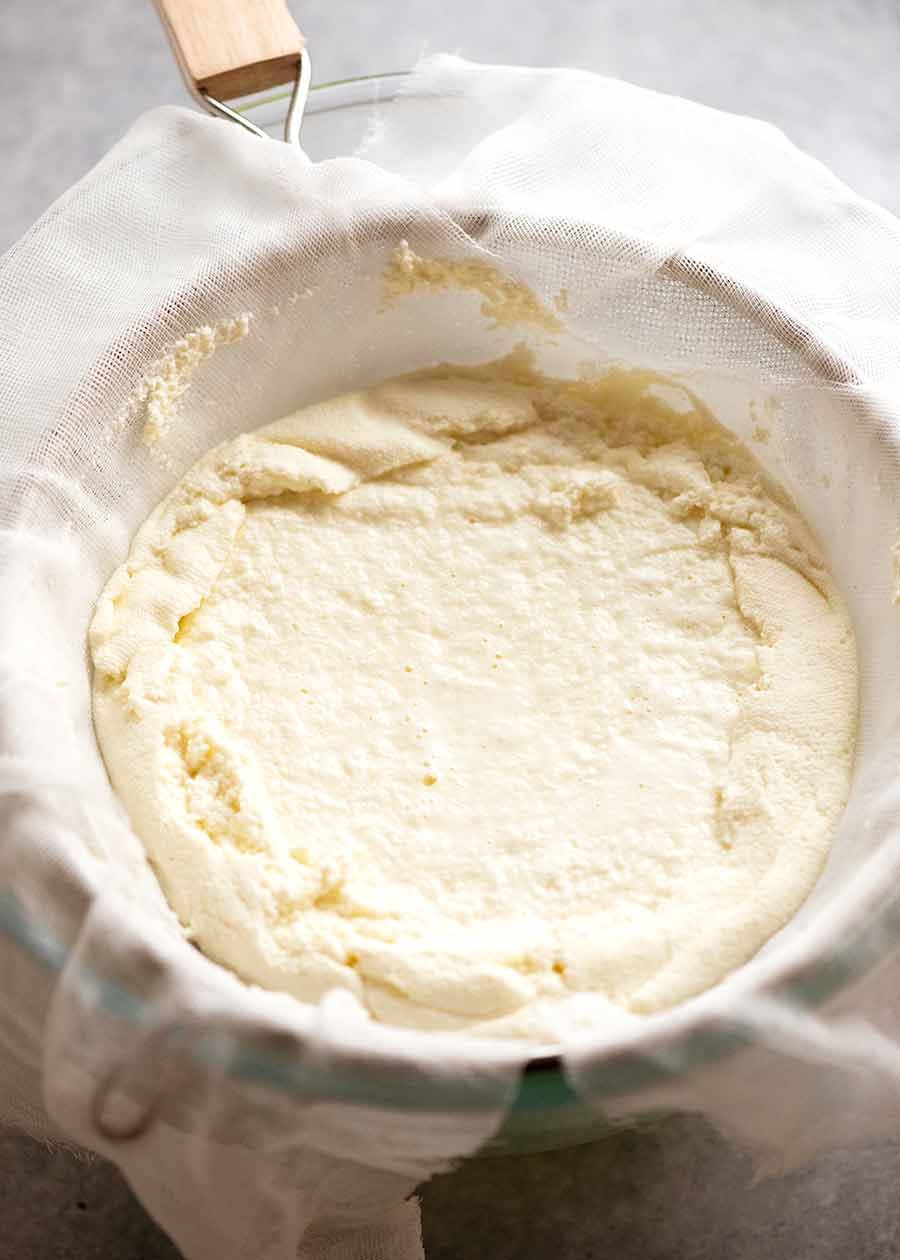

Rinse – Bundle up the paneer so it’s wrapped in the cheesecloth, Then give it a rinse under the tap. This is just to remove the excess lemon flavour.
Squeeze out excess water – Twist the top of the cloth and squeeze the bundle itself, to squeeze out excess water and whey.
You don’t need to use brute force here because we will be draining further in the fridge. Just squeeze out what you can. If the paneer starts getting forced out through the cheesecloth holes, you’re squeezing too hard!
At this stage, the paneer will still seem watery and wobbly. It sets more in the next step!

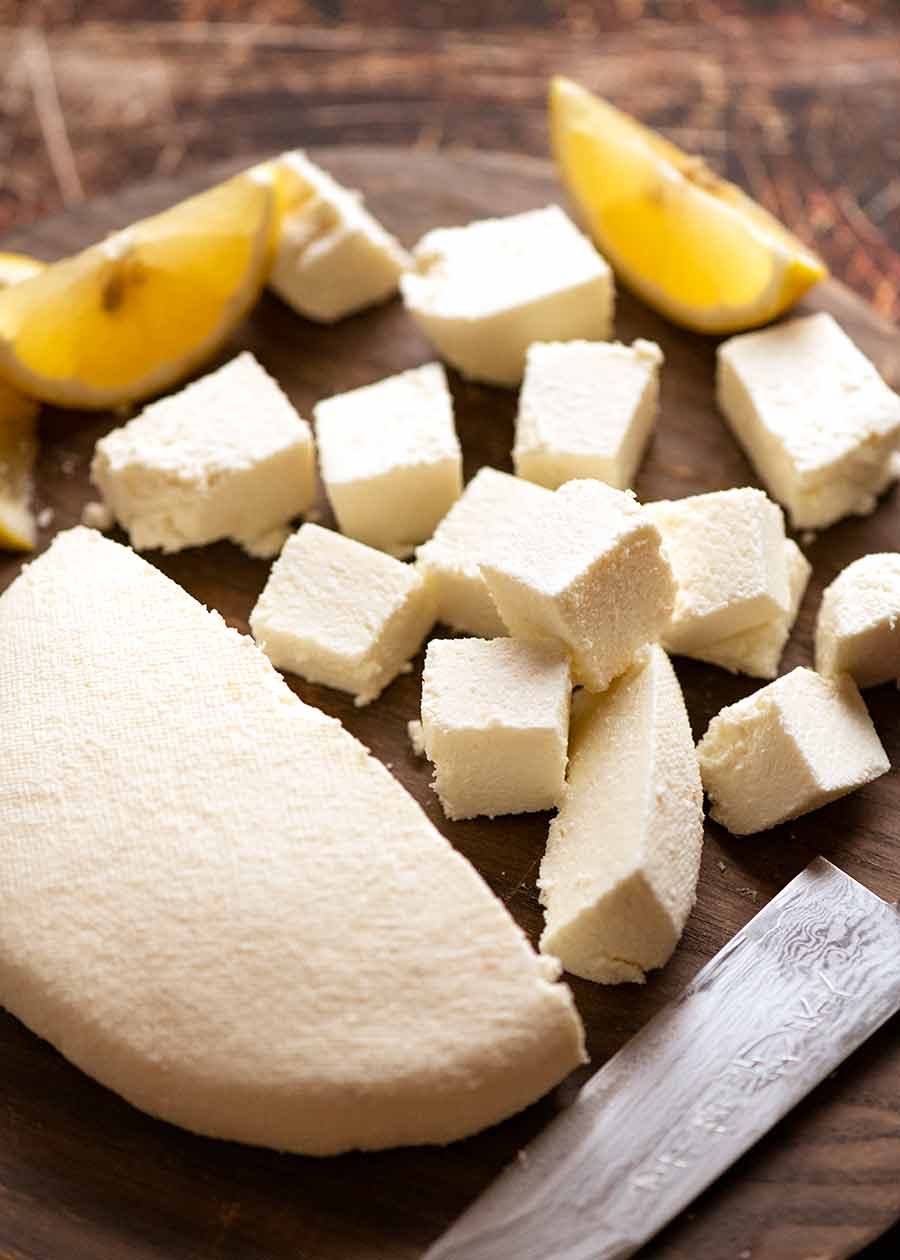
Prepare to refrigerate – Discard all the liquid in the bowl. Then set the paneer in the cheesecloth back in the strainer, and set over empty bowl. Shape the paneer into a 2cm/ 4/5″ thick disc.
Weigh down – Top with a small plate, then weigh down with 2 x 400g/14oz cans or something else of similar weight. This weight helps the paneer set because it’s compressing the cheese, as well as helping to further remove remaining excess water.
Leave in the fridge for 4 hours.
Try not to leave much beyond 4 hours. The longer the paneer is in the fridge with the weights on it, the firmer it will get (as more liquid continues to be pressed out of it).
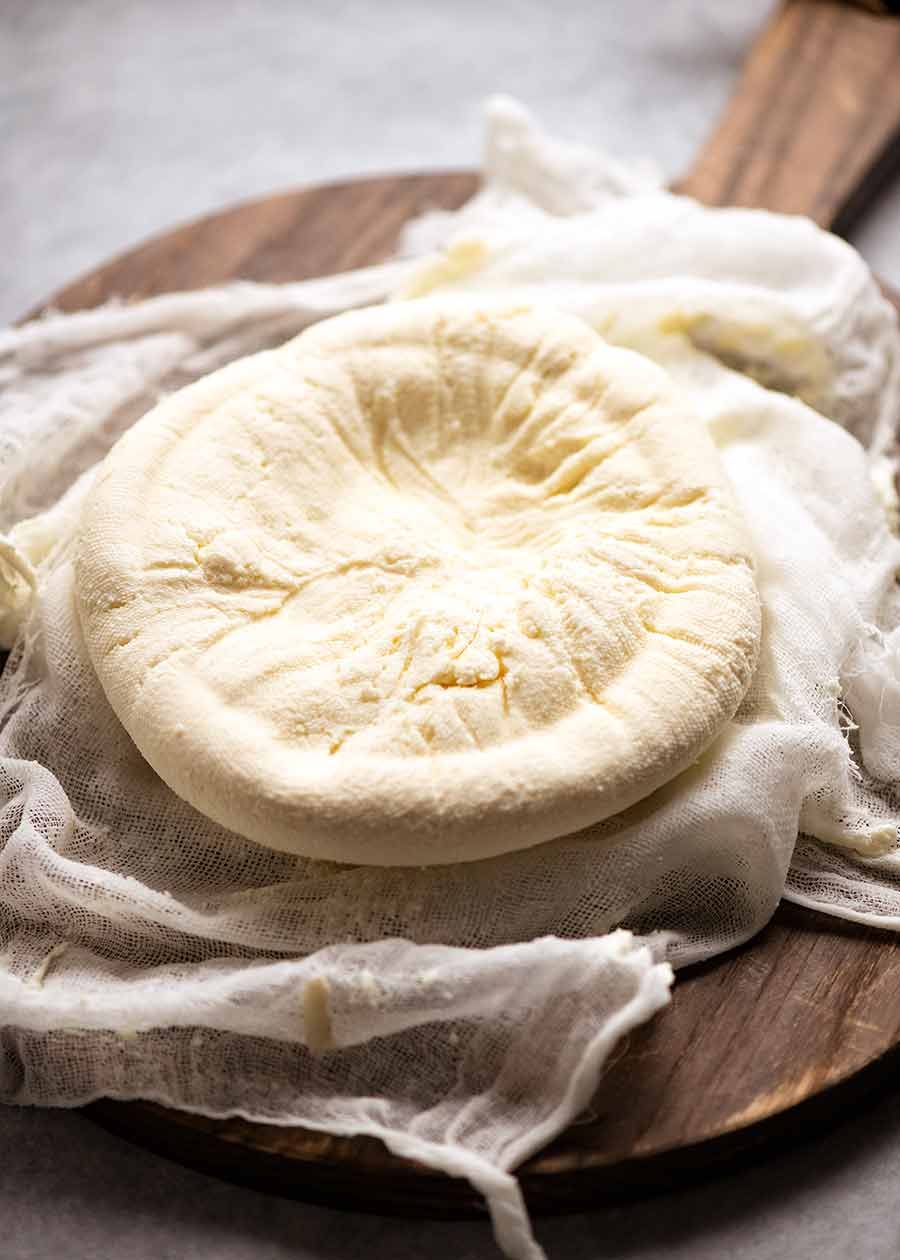
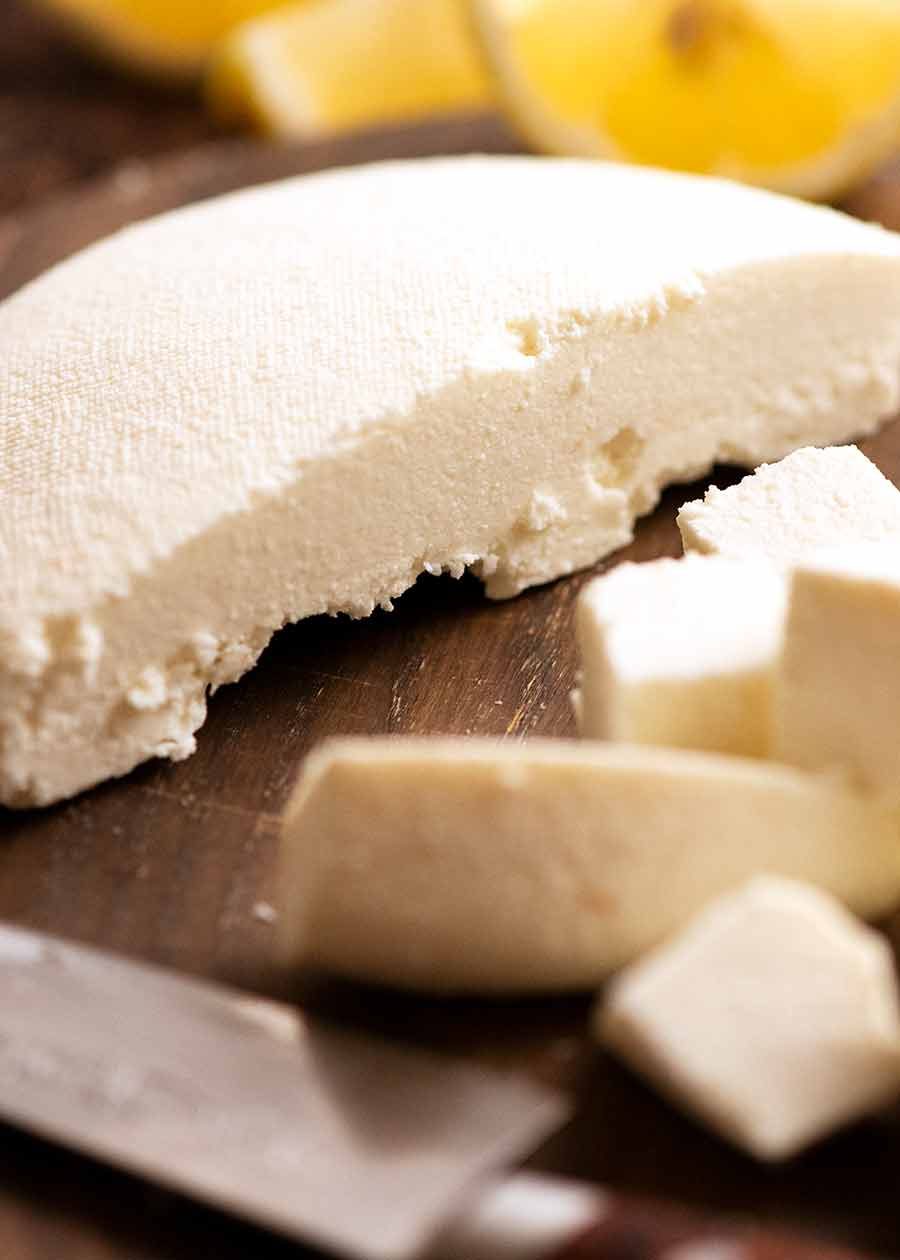
Ready for use! Remove the paneer from the fridge and unwrap it. There will be a dent in the middle – this is normal, it’s from the liquid draining away.
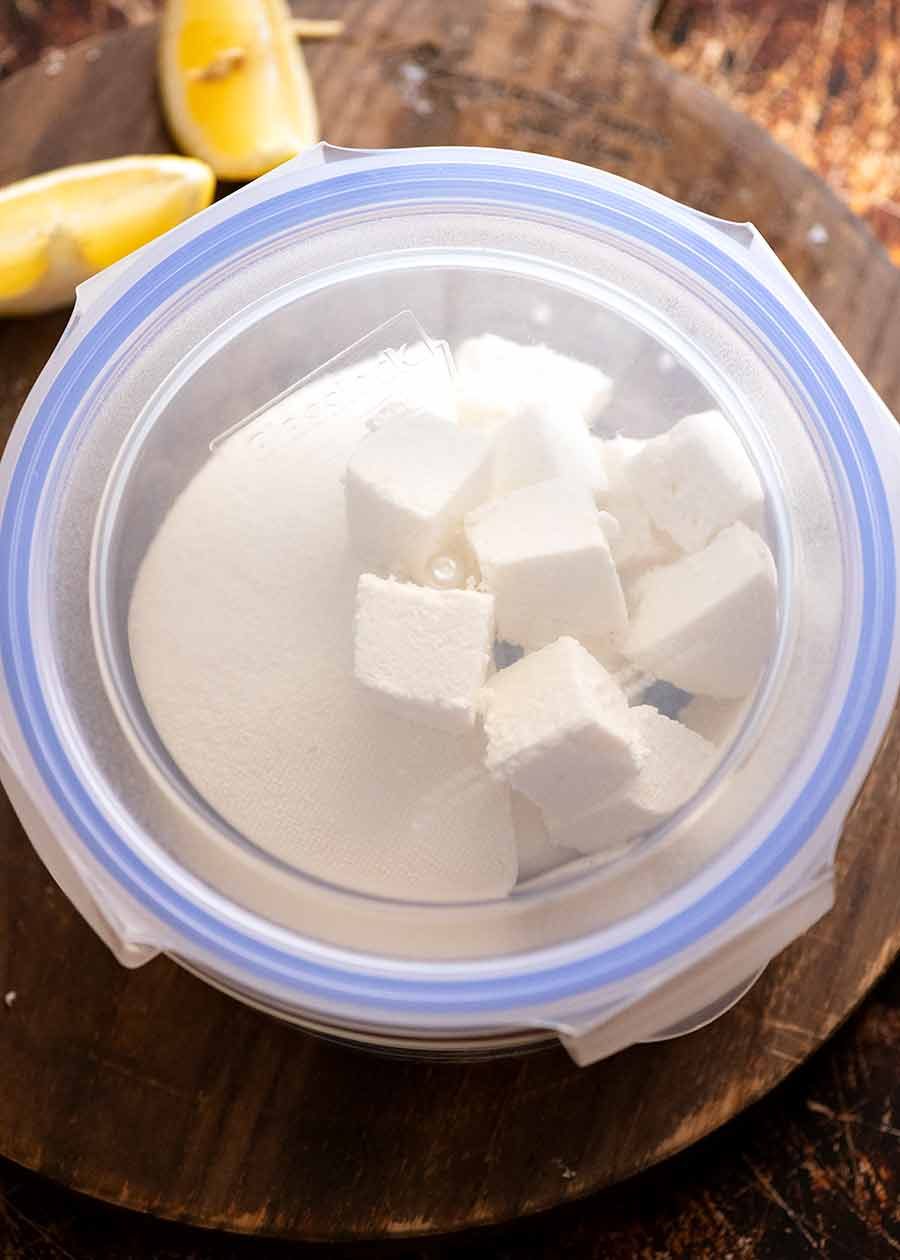
You can either use it immediately for cooking, or you can keep it for up to 2 weeks in the fridge. Just keep it whole in an airtight container, then cut off pieces as you need them!
How to cook and use paneer
Paneer is typically cut into small bite-size pieces, either cubes or rectangles. Then they are either:
Stirred into curries, just as-is. Paneer doesn’t need cooking, just heating through. The idea here is that the paneer absorbs the flavour of the curry sauce; or
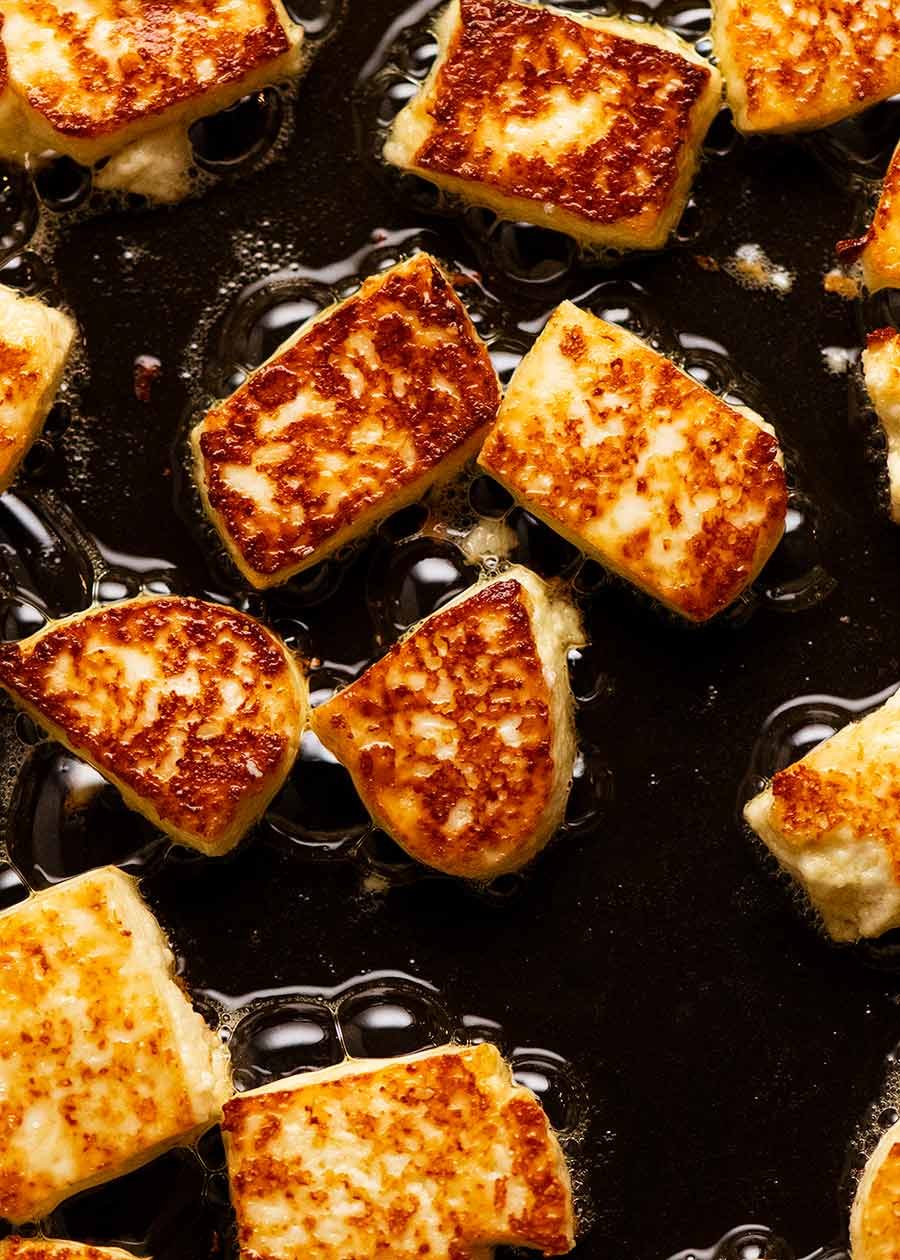
Pan-fried until golden – like you do halloumi – before being stirred into curries such as Palak Paneer, and other dishes.

It will come as no surprise to anyone that I prefer the latter. Because, as I always say, browning = flavour!! The paneer looks irresistible when it’s crispy and golden on the outside. You just want to eat it straight out of the pan. You really will. I do!
Bonus: Pan-frying also causes the paneer to set better, so it’s less likely to break up when stirred into curries – a common problem when uncooked paneer is stirred into curries.
Dishes using Paneer
I’m sharing today’s homemade paneer recipe for use in Palak Paneer, India’s famous Spinach Curry with Paneer.
But there’s a wide variety of other Indian dishes that use paneer, both savoury main dishes as well as desserts and snacks.
It’s also common to substitute paneer for meat in some dishes, as it makes a great vegetarian alternative that’s equally filling and satisfying. Here are a couple of curry recipes I’ve previously shared that can be made vegetarian by switching the meat with paneer:
Paneer Tikka Masala – Substitute the chicken with paneer in my Chicken Tikka Masala recipe; and
Paneer Butter Masala Curry – Switch the chicken in my Butter Chicken.
Enjoy! – Nagi x
Watch how to make it
Hungry for more? Subscribe to my newsletter and follow along on Facebook, Pinterest and Instagram for all of the latest updates.
Homemade Paneer (Fresh Indian Cottage Cheese)
Ingredients
- 2 litres / 2 quarts milk , full-fat (low-fat won't work)
- 4 tbsp lemon juice (sub white vinegar)
Instructions
Curdle milk:
- Heat the milk in a large saucepan over medium high heat until the top becomes foamy, just as looks like it's about to boil.
- Turn stove off. Add lemon juice and stir for 1 minute. The milk should begin to curdle. If it doesn’t, turn the stove back on and bring back to a gentle boil until the solids separate.
Strain & remove excess water:
- Line strainer or colander: Place over a deep bowl. Line strainer with 2 layers of cheesecloth (Note 1).
- Strain: Ladle in half of the curdled milk to begin with, then pour the rest in. Leave until all the liquid drains – this might take 5 to 10 minutes.
- Rinse: Discard liquid (whey) in the bowl. Bundle the paneer up in the cheesecloth (it will still be quite watery at this stage) then rinse bundle briefly under cold tap water. This helps to remove lemon flavour + cool for easier handling.
- Squeeze out excess water by twisting the cheesecloth and squeezing the bundle, but not so hard that paneer squeezes out through the cloth. Once liquid no longer comes out, stop. The paneer will still be quite soft at this stage.
Set in fridge:
- Weigh cheese down with weights: Shape cheese into a disc around 2cm / ¾" thick, still wrapped in cheesecloth. Place in a strainer or colander set over a bowl. Top with a small plate then 2 x 400g/14oz cans (or similar weight).
- Refrigerate for 4 hours. During this time the paneer will set (become firm) and remaining liquid will drain out. (Note 2)
Storage / cutting:
- Remove paneer from fridge and carefully unwrap. There will be a dent in the middle, this is normal (it's from the draining).
- At this stage, the paneer is now ready for use. You can either cut it immediately and use in a recipe (such as Palak Paneer!), or store the whole uncut block for another time and just cut when needed.
- Store in the fridge for up to 2 weeks, or freeze for 3 months.
Recipe Notes:
Nutrition Information:
Life of Dozer
Weekend teeth inspection. I always think he has disproportionally small teeth for a dog that big!!

You might want to revisit the carb count in your nutrition info. According to my quick search, most of the sugars are drained away with the whey.
AI summary:
A 4 oz. (113 gram) serving of homemade whole milk paneer contains approximately 315-407 calories, along with significant amounts of fat and protein. The exact nutritional content can vary based on the specific fat content of the milk used and how much whey is drained. [1, 2]
Estimated Nutritional Content (per 4 oz. or 113g) |
| — | — |
| Calories | 315 – 407 kcal |
| Fat | 22 – 28g |
| Saturated Fat | 14 – 18g |
| Protein | 20 – 24g |
| Carbohydrates | 4 – 5g |
| Calcium | 400 – 800mg |
| Sodium | 20 – 45mg |
Key Considerations • Fat Content: Whole milk paneer is naturally high in fat, which contributes significantly to its calorie count.
• Protein Source: It is an excellent source of protein, especially for vegetarians, providing all essential amino acids.
• Homemade vs. Commercial: Commercial paneer can have slightly different values due to standardization processes. Homemade estimates are generally in the range of 260-300 kcal per 100g (about 3.5 oz).
Thanks for this. Just followed a laborious recipe, which was completely wrong. Huge waste of time, milk, and electricity.
Your recipe has details the others don’t
It worked! 2 comments: 1-For absolute beginners, it is worth noting that when the milk/lemon “curdles” it does not look solid; it continues to look liquid. I reheated the milk, seemingly to no avail, then gave up and ladled, and it was just the thing! I had expected the milk to thicken considerably. 2-Don’t ‘discard’ the whey. As someone said, it is useful in cooking, but also–once cold–it is great for wetting your compost heap.
You refer to ‘Notes’ in the recipe, Where are the notes?
I skip the steps where you squeeze out the excess liquid by squeezing the cheesecloth and then chilling it under weights. This leaves me with something more like ricotta cheese or cottage cheese, and I use it in recipes in place of ricotta. I’m planning to try making cheesecake with it as well.
Can I use a Tofu press?
Thanks!
I make this often, and always have to look to other recipes for the answer.. What temperature should the milk be when you add the lemon juice?
It doesn’t have to be whole milk: you can make it with semi-skimmed. All it means is that you get a smaller yield. Similarly you can use skimmed as well, but the yield is so small, it’s probably not worth it. I use lactose-free milk (either whole or semi-skimmed) and it is just as successful. It’s a good way of using up extra milk if you find yourself with a surplus. But yes, it does work with semi-skimmed!
Don’t throw away the whey! Delicious and nutritious! Use it instead of water to cook rice or veggies.
Any reason this could not be salted?
I’m thinking it might affect the curdling so maybe add the salt to the curds after draining.
Yes…I read on another site to salt the curds after you put them into your strainer to drain.
Add the salt when you add the lemon juice.
Salting it before adding the lemon juice will change the way the milk proteins knit together and they’ll likely be more crumbly and like ricotta.
If you want it salted you could sprinkle some salt through after straining and rinsing, and before pressing, or just over the top of the pressed block at the end.
Dont throw away the whey. You paid for it so use it. Its full of goodness and can be used in your curries, breads, soups and stews
QQ – it says to use “full fat milk” – does this mean cream or do you mean whole milk? (Whole milk doesn’t have full fat, but I saw some people using A2 milk, which is closer to whole milk than cream.) Thanks in advance for clarifying!
-D
Can you let me know how much in grams is one batch of paneer? I cannot find this info
I just made this and got 260g of paneer.
Could you please tell me what *volume* of paneer can be made from 2 liters of milk. One of the commenters helpfully says 2 liters yields 300 grams or 10.5 ounces, but since an ounce can be a unit of either weight or volume, so I’m confused as to whether he means 10.5 ounces by volume or by weight.
I just made this and got 260g of paneer.
Weight, there are 28 grams to an ounce.
IF it’s water. Anything with oil or fat in it has much less mass. Pick up a liter of oil and a liter of water in the other hand sometime, and you’ll feel the difference. Oil has roughly 80% the mass of water.
There are 28 grams (by weight-rounded) in 1 oz (by weight). Where did I mention by liquid volume? Thanks though for the mansplain. 😉
What is the expected yield in mass/weight? (This is relevant primarily because the related Palak Paneer recipe calls for “1 batch.” Updating that recipe would be helpful as well!)
Depends whether you use full fat milk or semi-skimmed. The latter, obviously, yields a little less.
Absolutely sensational! Thank you, Nagi! Xo
I made this and it curdled just fine and I weighted as suggested for 4 hours. It came out seamingly fine, I cut it and then tried to pan fry and the whole thing turned to mush! Like a pile of cottage cheese. Any suggestions as to why?
I made this with A2 milk because I’m allergic to B2 milk. Because of this I’ve never had paneer before. It worked out perfectly well using one litre for the experiment. Thank you Nagi for sharing this recipe.
Hi everyone. Need some advice. Just made my paneer. It’s in the fridge. My milk curdled just fine. Except mine looks different to yours in the photo. Mine is alot more chuncky, if you like. Do you think it will set ok? Cheers.
This worked a treat!.
I used a thermometer and waited for the milk to reach 200F
When making cheese, 110 degrees f is the magic number, that is when it will curdle when acid/rennet is added. No need to bring it to scald